Altair 8800B Restoration
SHARE |
|
  Altair 8800B Restoration
 |
by Bill Degnan - 05/19/2013 19:59 |
|
The subject of this thread is to document the restoration of a previously-working Altair 8800B, which I accidentally shorted by inserting a RAM card with the power on (oops). After probing voltages and looking for A/C ripple, the general consensus of the MARCH workshop team was to open up the front panel to check for blown voltage resistors. The processor card checked out, but I could not examine memory locations or deposit memory. The front panel could not lock onto a location in memory, the front panel is largely un-responsive to toggled input.
Reply |
|
  8800b front panel
 |
by Bill Degnan - 08/26/2013 10:48 |
|
Learned from Martin E. of the Altair forum that there is a way to improve the front panel performance of the 8800b by "replacing IC 'R' on the D/C Interface board with a 7414. The manual calls for a 74LS04 here, which is not reliable."
while i have the system open I will also implement this. ALSO on the Altair files section > An anonymous donor has provided Extended ROM BASIC 16K for us. This is the real ROM-based product from MITS that executes directly from ROM and therefore does not use RAM to store BASIC itself. > > I have uploaded the ROM content in Intel hex format into a zip file in the "Files -> EPROMS" folder. > Mike says: "..Good news - the Extended BASIC ROM already has the DBL code in the upper 256 bytes! I generated a 48K CP/M and it runs fine in the same machine with Extended BASIC 16K in ROM. .." Reply |
|
  Front Panel Surgery
 |
by Bill Degnan - 12/12/2014 19:39 |
|
Before I can work on the front panel board I have to remove the front panel board cover. There are a few switches that have washer bolts holding the metal cover in place. They're recessed into the panel. I asked the Altair Yahoo Group for an alternative to using needle-nosed pliers. Click image for larger view.
NEXT: look up schematic proper values, remove washer bolts so I can get at the front panel board. Reply |
|
  Diagnosting Problems with D/C Board
 |
by Bill Degnan - 12/16/2014 19:59 |
|
Using a #8 deep socket I removed the 9 bolts that hold the front panel cover from the underlying MITS Altair 8800b Front Panel D/C Board. Click image for larger view.
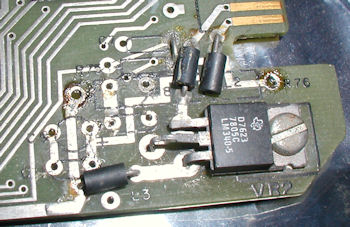
I downloaded the hardware manual for the 8800b to look up the expected voltage values. This is a good way to track down electrical problems - bad voltages often indicate a bad part in circuit. The first things to test are the components near the two voltage regulators on the D/C board, sections V1 and V2. Next I started testing the caps and voltage regulator in the VR2 (pictured above) and VR1 areas. Pictured is VR2, click image for larger view.
I noticed right away, even after applying power for only a few seconds that the resistor in the back of the board connected to R76 / R75 was cooking. Note the burned Styrofoam insulation. The resistor is supposed to be 5W / 5ohm but it measured around 7.7ohms. This is too high to be in spec so I removed it and ordered a replacement. Testing the voltage regulators more carefully than I was able to before showed they were still basically OK. Voltages to the S-100 bus were also OK. Click image for larger view.
I am not saying the only issue is the 5W 5ohm resistor in V2, but this is certainly not quite right. The smart thing to do in general with old MITS boards is replace all the vulnerable caps. I will start with VR2 and VR1. I also want to test all of the TTL chips. Fortunately they're all socketed and I have a TTL tester to make this an easy job. After the apparently bad resistor, caps and any bad TTL chips are replaced I will run tests via the checkout procedure using a logic probe and volt meter. Also an oscilloscope if needed. Or maybe the front panel will begin to work correctly and that will be that...stay tuned. Reply |
|
  Replace caps near V2
 |
by Bill Degnan - 01/23/2015 20:17 |
 Removed the caps in the V2 area, ordered replacements. One of the 47ohm caps was out of spec. Also tested the TTL chips. All passed. Click image for larger view.
Removed and replaced the 5W 5ohm resistor in V2, no improvement. Next, replace the caps. Reply |
|
  VR2 cap replacement no improvement
 |
by Bill Degnan - 03/08/2015 10:06 |
|
Replaced the caps, no improvement identical readings.
Reply |
|
  VR2 cap replacement no improvement
 |
by Bill Degnan - 03/08/2015 10:11 |
|
Replaced the caps, no improvement identical readings.
lights D0 --> D7 on W0 --> on WAIT --> on Can't examine R76 Resistor very hot to touch (when front panel cable attached only) large cap 10.44 no load Reply |
|
Resources:

Popular Topics and FAQs
Past Issues:
Before we switched over to a blog format, past page archives here:
Vintage Computer Festival East 3.0 June 2006
Commodore B Series Prototypes July 2006
VOLSCAN - The first desktop computer with a GUI? Oct 2006
ROBOTS! - Will Robots Take Over? Nov 2006
Magnavox Mystery - a Computer, or? Jan 2007
The 1973 Williams Paddle Ball Arcade Computer Game Feb 2007
The Sperry UNIVAC 1219 Military Computer May 2007
VCF East 2007 - PET 30th Anniversary June/July 2007
The Electronic Brain August 2007
Community Memory and The People's Computer Company October 2007
Charles Babbage's Calculating Machine December 2007
Vintage Computing - A 1983 Perspective February 2008
Laptops and Portables May 2008
From Giant Brains to Hobby Computers - 1957 to 1977 August 2008
Historic Computer Magazines November 2008
World's Smallest Electronic Brain - Simon (1950) December 2008 - Feb 2009
Free Program Listings Spring 2009
Computer Music Summer 2009
Popular Electronics Jan/Feb 1975 - Altair 8800 Fall 2009
Early Microcomputer Mass Storage Summer 2010
Toshiba LC 836MN

This image was selected at random from the archive. Click image for more photos and files from this set.