Digital VAX 4000-200
SHARE |
|
 Digital VAX 4000-200
 |
by Bill Degnan - 04/27/2015 12:25 |
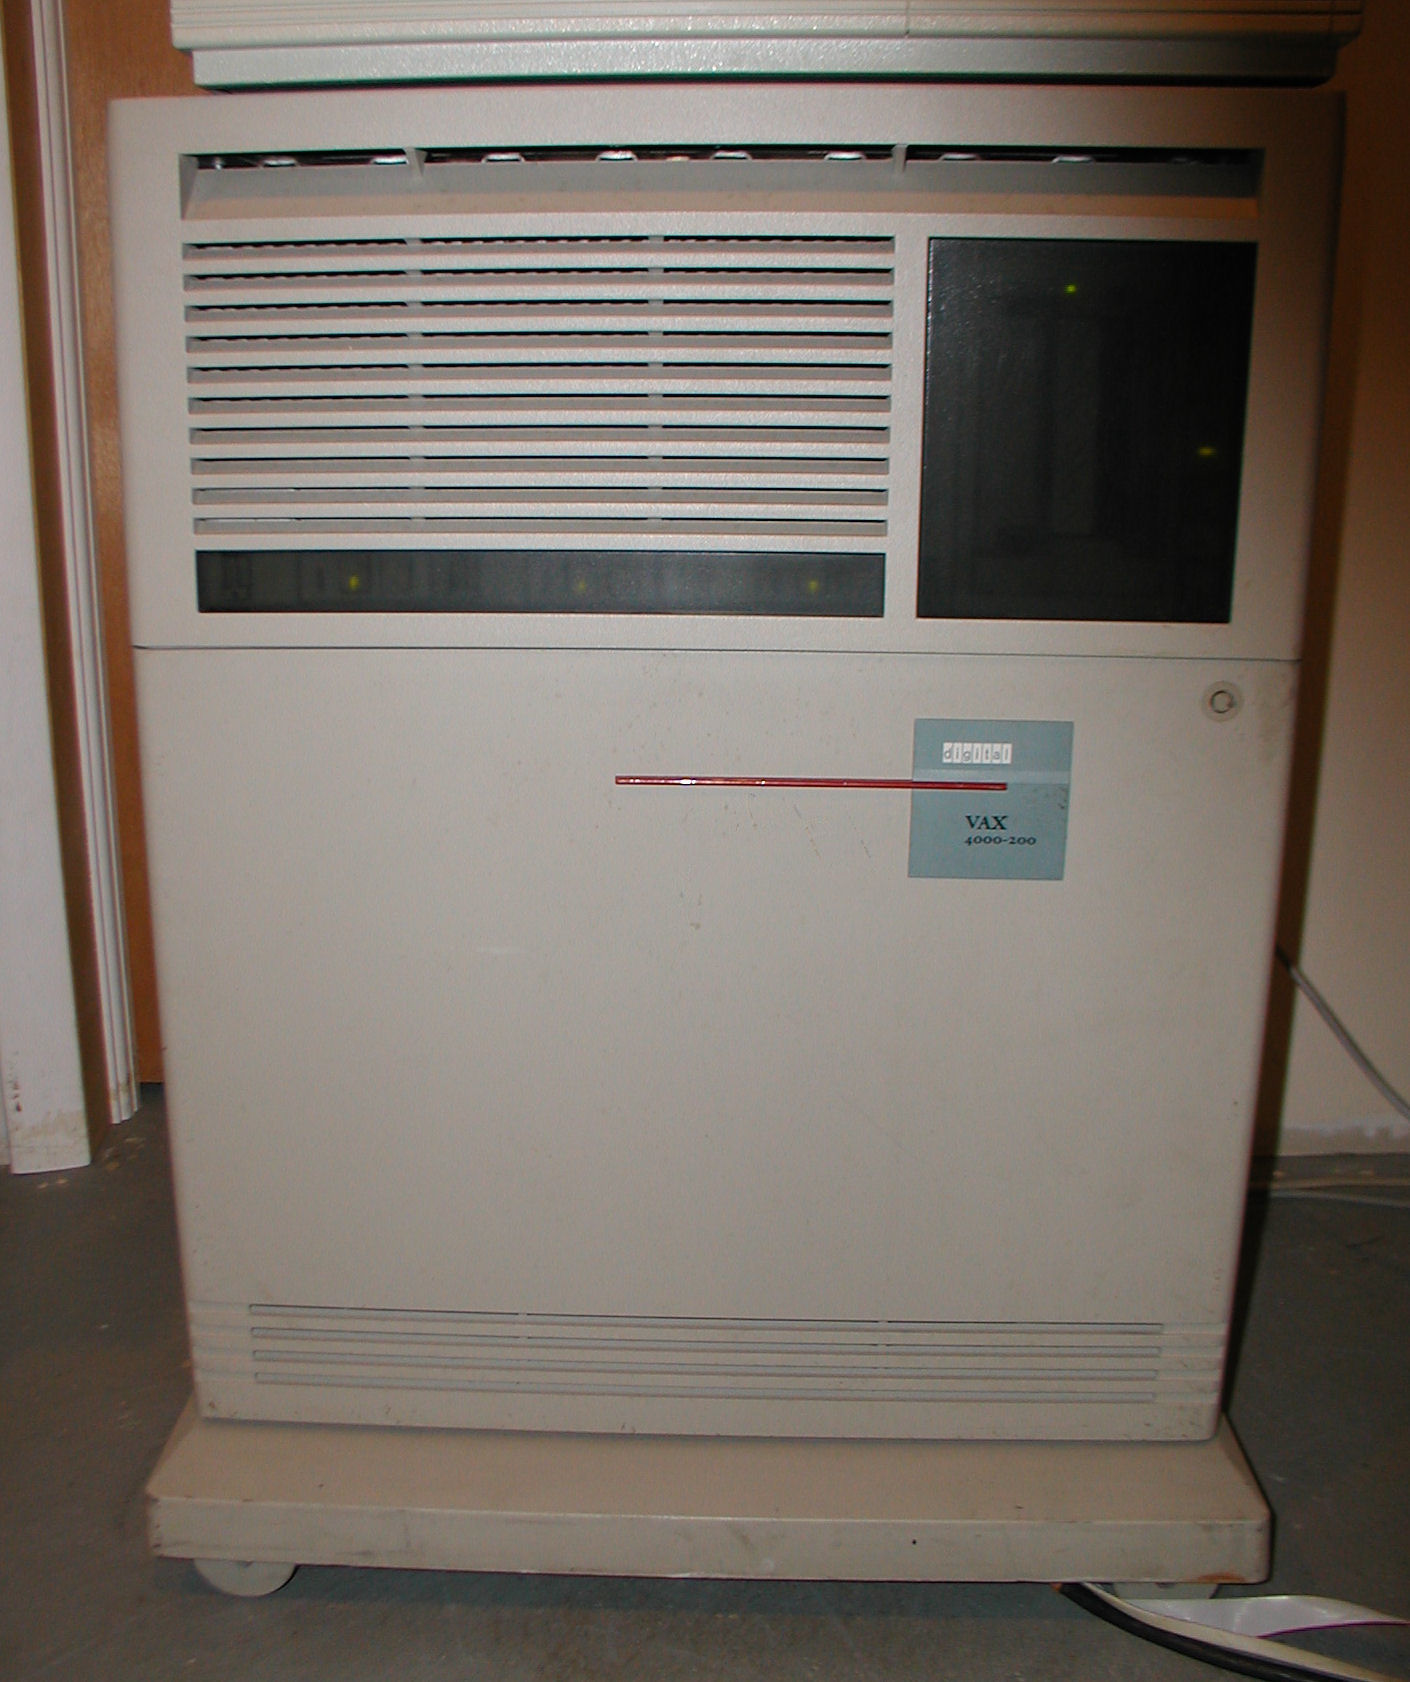 The Digital VAX 4000-200. Click for larger image.
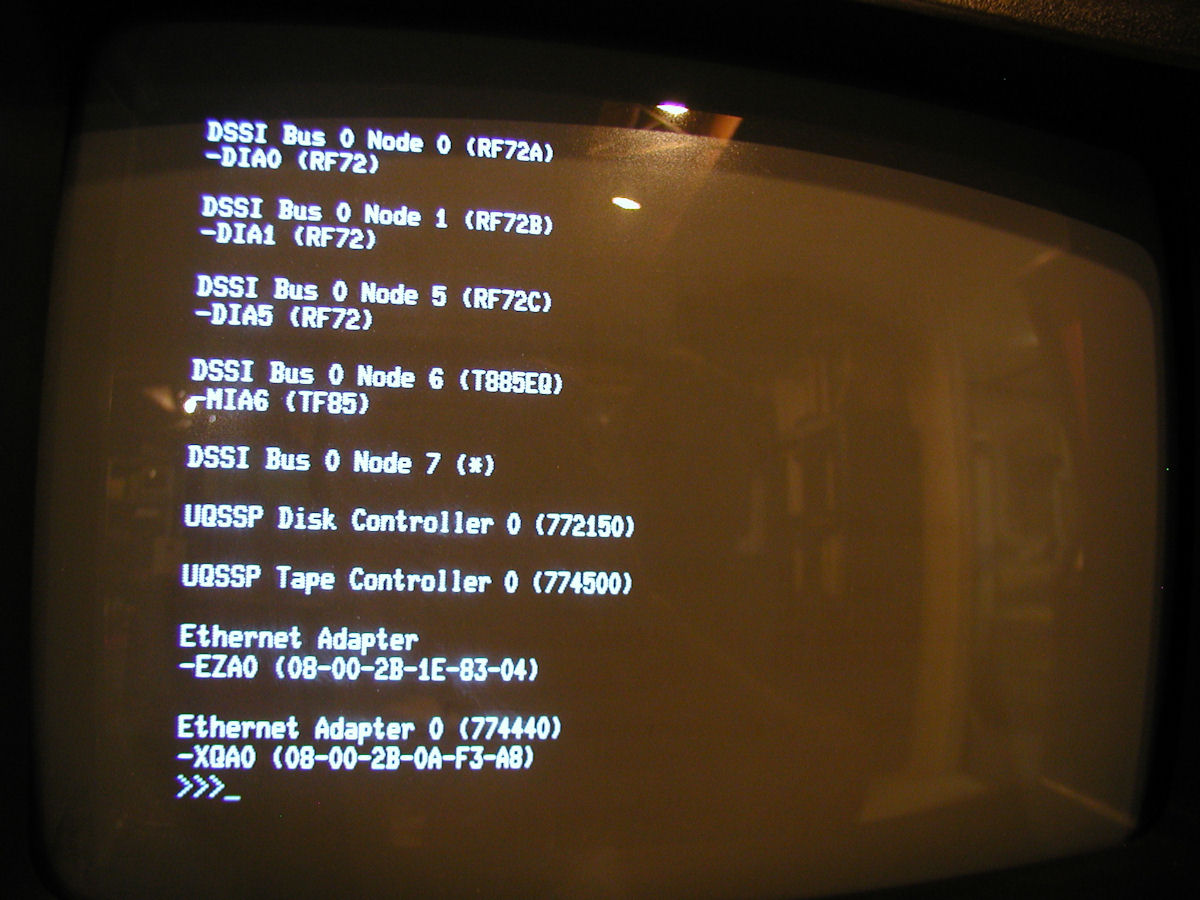 The SHOW DEV Output. Click for larger image.
Reply |
|
 How to reset VAX password
 |
by Bill Degnan - 04/27/2015 23:35 |
|
You typically get to the "three greater than's prompt". Run the SHOW DEV command if you don't know what to B/1 (boot) to. My system's boot drive is DIA0:, yours will likely be different. Keep trying them until it works. For me DIA0: was the boot drive, there was also a DIA1: and a DIA5: among others. Take a look at the photo above that shows the SHOW DEV output.
>>> B/1 DIA0: This will eventually drop you to the SYSBOOT prompt. SYSBOOT> SET/STARTUP OPA0: SYSBOOT> SET WINDOW_SYSTEM 0 SYSBOOT> SET WRITESYSPARAMS 0 SYSBOOT> CONTINUE This will drop you to the $ prompt. $ SPAWN $ @SYS$SYSTEM:STARTUP $ SET DEFAULT SYS$SYSTEM: $ RUN SYS$SYSTEM:AUTHORIZE This will drop you to the UAF prompt. UAF> MODIFY SYSTEM /PASSWORD=DEGNANISPERSISTANT UAF> EXIT This will bring you back to the $ prompt. Log out $ LOGOUT The VAX then asked me to reset my password to something 8-32 chars, etc. From there I got to a $ prompt with full access privs. Now to learn what is here! Reply |
|
|
WVLink |
by Bill Degnan - 04/28/2015 14:40 |
|
Apparently this VAX server was used to host an Internet service from 1994/95/96/? called WVlink. MPL Corporation was the company behind this service from Buckhannon, WV. A true piece of early Internet WWW-vintage history.
WVLink Flyer Reply |
|
|
TCP/IP for VAX Internet Services |
by Bill Degnan - 04/28/2015 21:19 |
|
Given the system is already configured for hosting Internet services, I will update to match the IP and DNS available to my home Comcast Business service with a fixed IP address. Here is a nice checklist for Open VMS 6.2. I have already gathered the present values from the server, I presume all I have to do is change them to match the new network. I also need to run some basic Ethernet port tests, make sure it's at least attempting to communicate with the outside world.
http://h30266.www3.hp.co....html#config_checklist1 Reply |
|
|
MULTINET TCP/IP Networking Done. |
by Bill Degnan - 05/02/2015 22:59 |
|
Updated the configuration of the server to use MULTINET.
I am now able to access external web resources (so far that means telet) via the VAX 4000 using a VT 102 terminal. The new subdomain is VAX4000.VINTAGECOMPUTER.NET You can connect to this server via telnet so far, but I have to set up the server to be more secure before I can start handing out users/passwords. Reply |
|
|
Public Access to VAX server |
by Bill Degnan - 05/05/2015 12:05 |
|
During the business week I plan to leave this system running. I created a low privlidge test account people can use via telnet -
vax4000.vintagecomputer.net user: USERNAME pass: contact me. I know, hard to remember, but do your best...I will eventually change the password, so you'll have to contact me for the latest password if you want to play on the VAX. If you uncover a security hole please contact me. Reply |
|
|
Adding Users |
by Bill Degnan - 07/09/2015 12:54 |
|
Find where the user directory on your server is and replace aaaaaa and bbbb with the actual values.
My 4000-200 is MPLHST CREATE/DIRECTORY aaaaaa$bbbb:[aaaaaa.PERSONAL.USERNAME] /OWNER=[USERNAME] Then is the basic sequence: $ set process/privileges=all $ set default sys$system: $ run authorize UAF> show [group,*] /brief UAF> add username /uic=[group,member] /account=account UAF> modify username /password=password UAF> modify username /device=sys$sysdevice UAF> modify username /directory=[directory] UAF> modify username /owner="Given Name" UAF> modify username /nopwdexpir /flag=nodisuser UAF> modify username /defprivileges=(...) /privileges=(...) UAF> modify username /flags=nodisuser UAF> exit $ create /directory /owner=[group,member] sys$sysdevice:[directory] /OWNER=[USERNAME] Reply |
|
|
Screaming Drive |
by Bill Degnan - 07/10/2015 04:45 |
|
The left-most drive when looking from the front went into fault today. The system still works but I took it down for repairs. I may have a suitable replacement drive, but I am guessing based on past experience I need to replace with a same size/specs drive.
Reply |
|
|
Upgrade to OPenVMS 7.3 |
by Bill Degnan - 08/07/2015 09:51 |
|
Should this be of interest, I may someday want to upgrade once I get a replacement drive.
http://h20565.www2.hpe.c...623149&lang=en-us&cc=us https://mail.google.com/...#inbox/14f08c5c553c1038 This applies to the 4000 class VAXen Reply |
|
|
Replacing Model RF72 Hdrive |
by Bill Degnan - 11/10/2015 15:00 |
|
Ordered a replacement hard drive for the 4000. The model is RF72 1Gb. Seller claims 1 year warranty!
Reply |
|
|
Initializing Replacement Hard Drive |
by Bill Degnan - 11/17/2015 17:39 |
|
reference:
http://vaxhaven.com/VAX_4000-200 After a little elbow grease I was able to move the rails from the old drive to the replacement I picked up from Ebay. The seller offered a 1 year warranty and the drive installed without incident. Next I need to initialize ? Reply |
|
|
VAX 4000-200 FAQ for Support |
by Bill Degnan - 11/18/2015 11:15 |
|
The following FAQ comes from the documentation. The specific model I have is the VAX 4000 model 200 system in the BA430 enclosure
Processor: KA660 / 28 MHz Cache: 6 kB Memory: 8 MB / 64 MB Disk: 381 MB / 21 GB Interfaces All support Q–bus, DSSI, and Ethernet. Model 100 also supports SCSI. Models 200/300/400/500/600 B400X, R400X, RF31, RF35, RRD42 — See above TLZ04 1.2 GB tape drive TSZ07 140 MB tape drive RF72 1.0 GB ISE RF73 2.0 GB ISE TF85 2.6 GB tape drive TK70 296 MB tape drive TU81 140 MB tape drive CXA16 16-line asynchronous CXY08 8-line asynchronous DSV11 2-line synchronous Model 200 Documents EK-432AB-IN VAX 4000 Model 200 (BA215) Installation EK-433AA-OM VAX 4000 Model 200 (BA215) Operation EK-436AB-IN VAX 4000 Model 200 (BA430) Installation EK-395AB-OM VAX 4000 Model 200 (BA430) Operation EK-396AB-TM VAX 4000 Model 200 Technical Information EK-437AB-TS VAX 4000 Model 200 Troubleshooting and Diagnostics drives in "Mass Storage Shelf" of BA430 ISE 2 | ISE 1 | ISE 0 | Tape Drive Console Commands SHOW QBUS Displays all Q22–bus I/O addresses that respond to an aligned word read, plus vector and device name information. For each address, the console displays the address in the VAX I/O space in hexadecimal, the address as it would appear in the Q22–bus I/O space in octal, and the word that was read in hexadecimal. Also displays the vector that you should set up, and device name or names that could be associated with the CSR. SHOW RECALL Displays the current state of command recall, either ENABLED or DISABLED. SHOW RLV12 Displays all RL01 and RL02 disks that appear on the Q22–bus. SHOW SCSI1 Shows any SCSI devices in the system. SHOW TRANSLATION Shows any virtual addresses that map to the specified physical address. SHOW UQSSP Displays the status of all disks and tapes found on the Q22–bus that support the UQSSP protocol. For each such disk or tape on the Q22–bus, the firmware displays the controller number, the controller CSR address, and the boot name and type of each device connected to the controller. The command does not indicate whether the device contains a bootable image. ----------------------------------- SHOW... DEV - everything DSSI - Shows the status of all nodes that are on the DSSI bus. For each node on the DSSI bus, the console displays the node number, the node name, and the boot name and type of the device, if available. The command does not indicate the "bootability" of the device. The node that issues the command reports a node name of "*". The device information is obtained from the media type field of the MSCP command GET UNIT STATUS. In the case where the node is not running or is not capable of running an MSCP server, no device information is displayed. more SHOW... MEMORY - ETHERNET - QBUS - RLV12 UQSSP - DISKS AND TAPES ON Q22-BUS THAT SUPPORT UQSSP SCSI - VERSION - ------------------------- SHUTDOWN SYS$SYSTEM:SHUTDOWN.COM - NORMAL RUN SYS$SYSTEM:OPCCRASH - IF CRASHED/ING -------------------------- BOOT DEVICE NAMES VAX 4000 Models 200/300/400/500/600 RF-series disk On-board DSSI adapter DImu KFQSA DSSI adapter DUcu RRD4x drive KZQSA adapter DKAu KRQ50 controller DUcu TF-series tape On-board DSSI adapter MImu TF85 tape On-board DSSI adapter MIAu KFQSA DSSI adapter MUcu TK70 tape TQK70 MUcu TLZ04 tape KZQSA adapter MKAu Ethernet On-board adapter EZA0 DESQA Ethernet controller XQAu PROM MRV11 module PRAu where... Key to device logical names • m — DSSI bus adapter: A = bus 0; B = bus 1 When under operating system control, DIBu devices are recognized as DIAu devices. To obtain a list of boot devices available on the system, issue the console command SHOW DEVICE. Example 5–1 is a sample SHOW DEVICE listing for a VAX 4000 system. The system displays the device logical name preceded by a dash (–) for each device. Example 5–1 Sample SHOW DEVICE Display >>>SHOW DEVICE DSSI Bus 0 Node 0 (CLYDE) -DIA0 (RF73) [THIS IS MY BOOT DEVICE] DSSI Bus 0 Node 1 (BONNIE) -DIA1 (RF73) DSSI Bus 0 Node 5 (TFDR1) -MIA5 (TF85) DSSI Bus 0 Node 6 (*) DSSI Bus 1 Node 7 (*) UQSSP Tape Controller 0 (774500) -MUA0 (TK70) SCSI Adaptor 0 (761400), SCSI ID 7 -MKA0 (DEC TLZ04 1991(c)DEC) Ethernet Adapter -EZA0 (08-00-2B-06-10-42) • c — Disk or tape controller designator: A = first, B = second, and so on • u — unit number • x — SCSI ID of device, (except ID 6 — reserved for SCSI controller) • nn — SCSI logical unit number; usually 00. --------------------------- BOOT/R5:0 DIA0 [AUTOBOOT MY SYSTEM] The BOOT command syntax is as follows: >>> BOOT [/qualifier...] [device_name[,device_name...]] -------------------------- SYSGEN (FROM THE SYSBOOT> PROMPT) Usually CONTINUE given the way you typcially boot (B/1) SET/STARTUP Sets the name of the system startup command procedure. -------------------------- The SET BOOT console command allows you to specify a default boot device, or a list of devices, which the system will search for boot software. Once a default boot device is defined, the system will automatically boot from the device on power up or after a power-fail or error halt. If a boot device list is defined, the system will boot from the first device on the list which contains bootable software >>> SET BOOT [/qualifier...] device_name[,device_name...] SET BOOT EZA0 Defines the default boot device to be the Ethernet controller. SET BOOT DUA0,DIA0,MIA5,EZA0 Defines a boot device search string with DUA0, DIA0, MIA5, and EZA0 as possible boot devices. When attempting an autoboot, or if the BOOT command is issued without specifying a device, the system checks each device in order and boots from the first one that contains bootable software ------------------- installing standalone BACKUP (check whether it's already there, if not..) $ @SYS$UPDATE:STABACKIT SYS$SYSDEVICE: When the procedure finishes, the system displays the following message: The kit is complete. The STABACKIT procedure places the files in the directories [SYSE.SYSEXE] and [SYSE.SYS$LDR] on the system disk. It lists the files as they are copied. If you want to install standalone BACKUP in another directory,change the target directory from SYS$SYSDEVICE: to the directory of your choice. Note you should install on the backup drive so you can restore from it. ------------------- BACKUP 1. Boot standalone BACKUP. 2. Enter the BACKUP command in one of the following formats. If backing up to disk: $ BACKUP/IMAGE/VERIFY source_drive: target_drive: source_drive Device name of the system disk drive. target_drive Device name of the drive holding the backup disk or tape. Note: Before the backup operation begins, the target device is initialized, erasing all data currently on the device. example $ BACKUP/IMAGE/VERIFY DIA0: DIA1 The system displays the following message. %BACKUP-I-STARTVERIFY, starting verification pass When the procedure is finished, the system displays a message similar to the following: %BACKUP-I-PROCDONE, operation completed. Processing finished at 18-JAN-1993 15:23 If you do not want to perform another standalone BACKUP operation, use the console to halt the system. If you do want to perform another standalone BACKUP operation, ensure the standalone application volume is on-line and ready. Enter "YES" to continue Action: Stop the system. If the system has a Halt button, press it twice. Ensure that the light on the button goes off. If the system does not have a Halt button, press the Break (F5) key. Reboot the system. To prevent the BACKUP command from reinitializing the target disk, use the /NOINITIALIZE qualifier. For more information about initializing a disk, see the Guide to Maintaining a VMS System. For more information on the BACKUP command, see the VMS Backup Utility Manual. ------------------------------- RESTORING SYSTEM DISK Determine the device name of the drive holding the system disk, and of the drive holding the backup disk or tape cartridge. Enter the SHOW DEVICE command at the console prompt if needed for a list of devices. Boot standalone BACKUP Enter the BACKUP command in one of the following formats. • To restore from a backup disk: $ BACKUP/IMAGE/VERIFY source_drive: target_drive: source_drive Device name of the drive holding the backup disk or tape cartridge. target_drive Device name of Examples: • Restoring from a backup disk: $ BACKUP/IMAGE/VERIFY DIA0: DIA1: The system displays the following message: %BACKUP-I-STARTVERIFY, starting verification pass When the procedure is finished, the system displays the following message: %BACKUP-I-PROCDONE, operation completed. Processing finished at 19-APR-1991 15:00:00.00 If you do not want to perform another standalone BACKUP operation, use the console to halt the system. If you do want to perform another standalone BACKUP operation, ensure the standalone application volume is online and ready. Enter "YES" to continue: Action - stop the system reboot Reply |
|
|
BACKUP from DIA1 |
by Bill Degnan - 11/18/2015 12:09 |
|
StandAlone Backup installed on DIA1, if you boot to this drive you can initiate the standalone backup. Tested/OK
Reply |
|
|
INITIALIZE / MOUNT |
by Bill Degnan - 11/18/2015 20:46 |
|
So I tried to format the drive, here is a log of the attempt:
$ SHOW DEV DIA0 Device Device Error Volume Free Trans Mnt Name Status Count Label Blocks Count Cnt $1$DIA0: (RF72A) Mounted 0 VMS062 709740 185 1 $ SHOW DEV DIA1 Device Device Error Volume Free Trans Mnt Name Status Count Label Blocks Count Cnt $1$DIA1: (RF72B) Online 0 $ SHOW DEV DIA5 Device Device Error Volume Free Trans Mnt Name Status Count Label Blocks Count Cnt $255$DIA5: (RF72) Online 0 $ INITIALIZE DIA5: ISE2 %SYSTEM-W-NOSUCHDEV, no such device available $ MOUNT DIA5: _Label: TEST _Log name: TEST %MOUNT-F-NOSUCHDEV, no such device available $ ------------- What's wrong? ------------- I learned from glsick of vintage-computer.com/ "While you can SHOW DEV DIA5: without the leading $255$ you need to include the leading $255$ when you initialize and mount the volume on your system. " So, in my case that would be: INITIALIZE $255$DIA5: vmsbak $255 appears to be a "shadow set" for grouping drives, I suppose useful for differentiating same named drives in a cluster. Here is more info: http://h71000.www7.hp.co...a554_90020/ch04s11.html FROM MY SYSTEM: $ show device $255$dia5: Device Device Error Volume Free Trans Mnt Name Status Count Label Blocks Count Cnt $255$DIA5: (RF72) Online $ show device $1$ Device Device Error Volume Free Trans Mnt Name Status Count Label Blocks Count Cnt $1$DIA0: (RF72A) Mounted 0 VMS062 709740 185 1 $1$DIA1: (RF72B) Online 0 OK...one more question - why does this system come with 3 drives anyway? I need to learn more about what you do with three drives to optimize a system like this. DIA0 = system drive VMS 6.2 DIA1 = standalone backup DIA5 = new drive I will use as a system drive backup. stand by for initialize results... Reply |
|
|
Image Backup of Primary System Disk |
by Bill Degnan - 11/19/2015 12:19 |
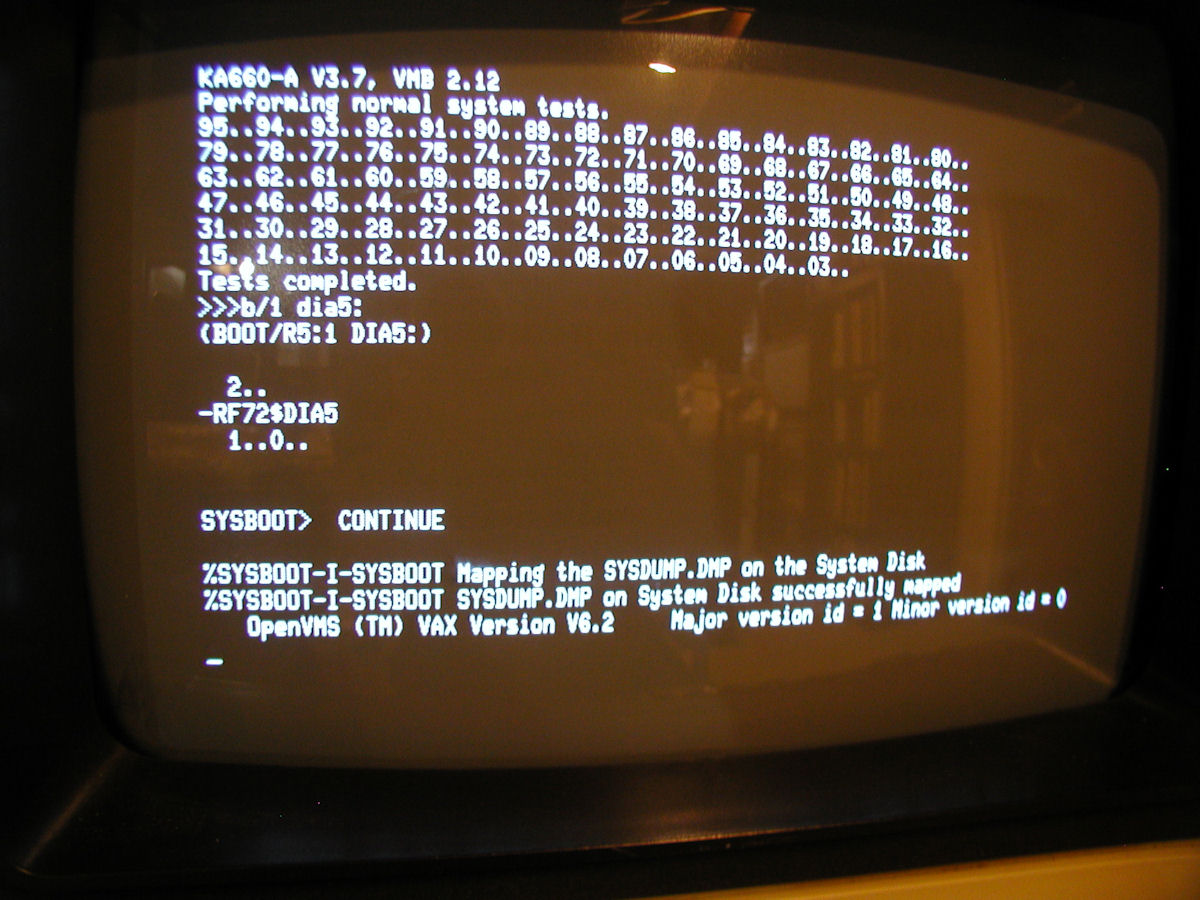 Display of the alt system disk, DIA5, booting up to VMS 6.2 after image created from DIA0. Click image for larger view.
After successfully initializing the new hard drive, using this command: INITIALIZE $255$DIA5: vmsbak I used it to store a bootable image of the primary hard drive, thus the volume name "vmsbak". This way if the primary drive fails I have a copy that will boot. commands: dismount/nounload $255$dia5: (response - "device is not mounted") mount/foreign $255$dia5: (response was "..mounted..") backup /image/ignore=interlock $1$dia0: $255$dia5: (from page 44 of the OpenVMS System Management Guide) Reply |
|
|
Replace NiCad Battery |
by Bill Degnan - 11/19/2015 13:32 |
 First locate the KA660 M7626 bulkhead cover and carefully remove it. It's on the right of this photo, click image for larger view.
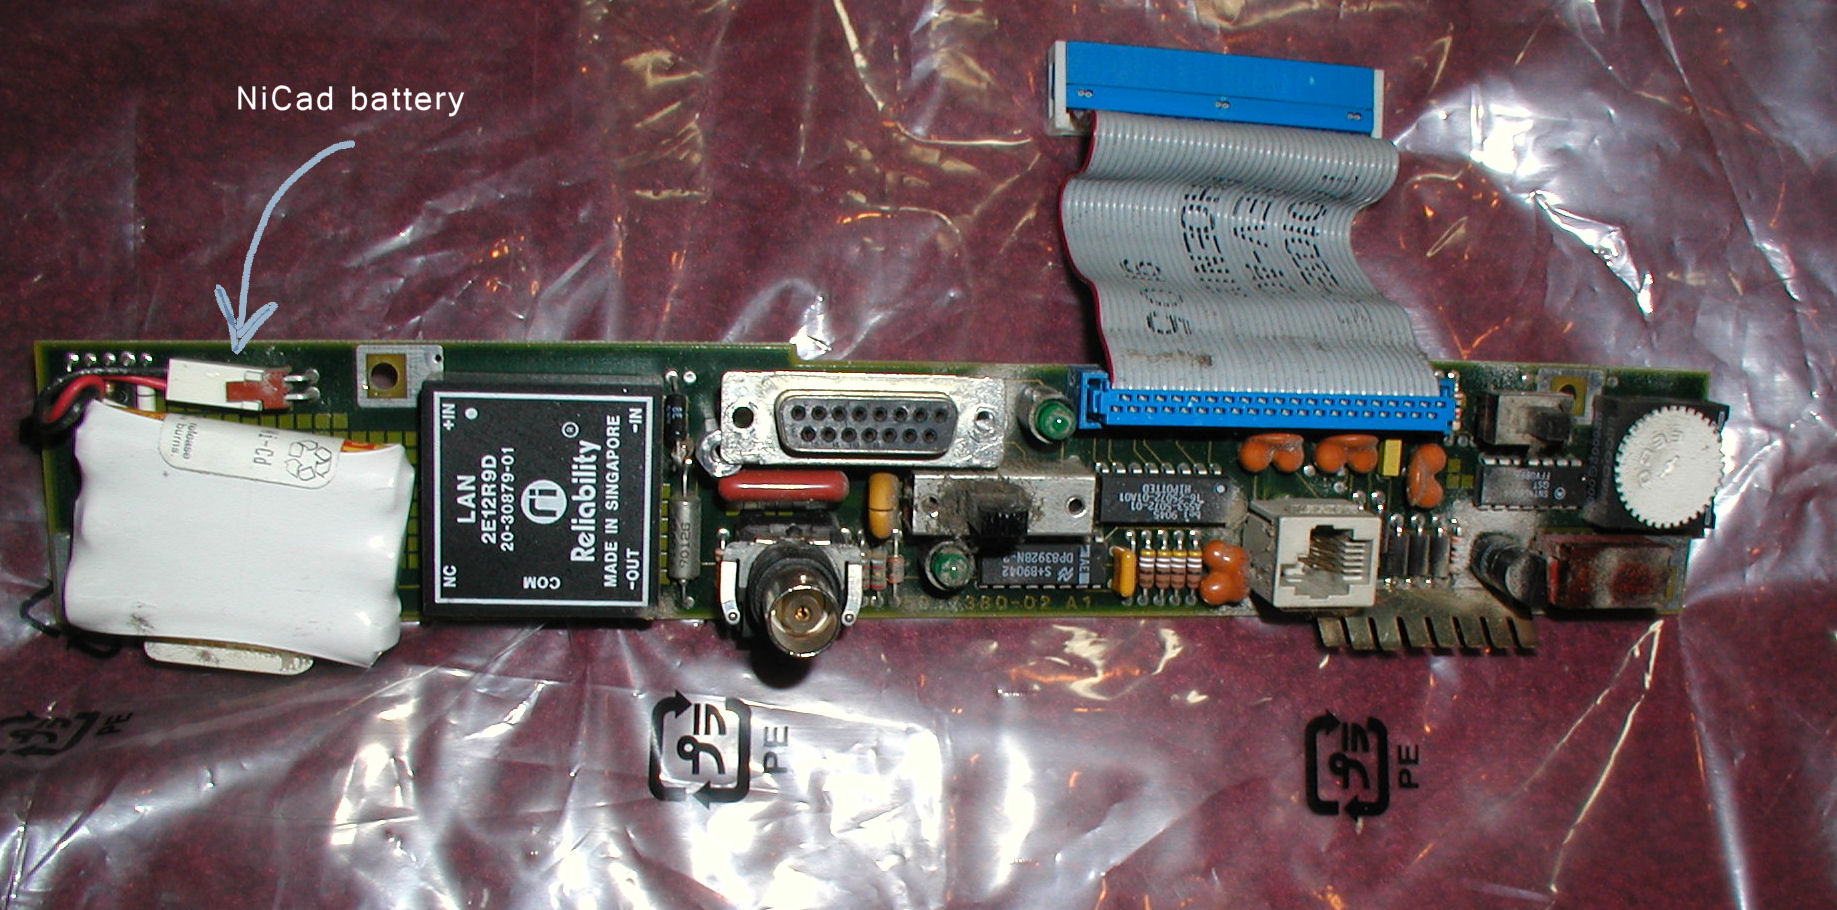 KA660 M7626 removed from bus. Item cleaned and NiCad battery removed. No leakage detected. Click image for larger view.
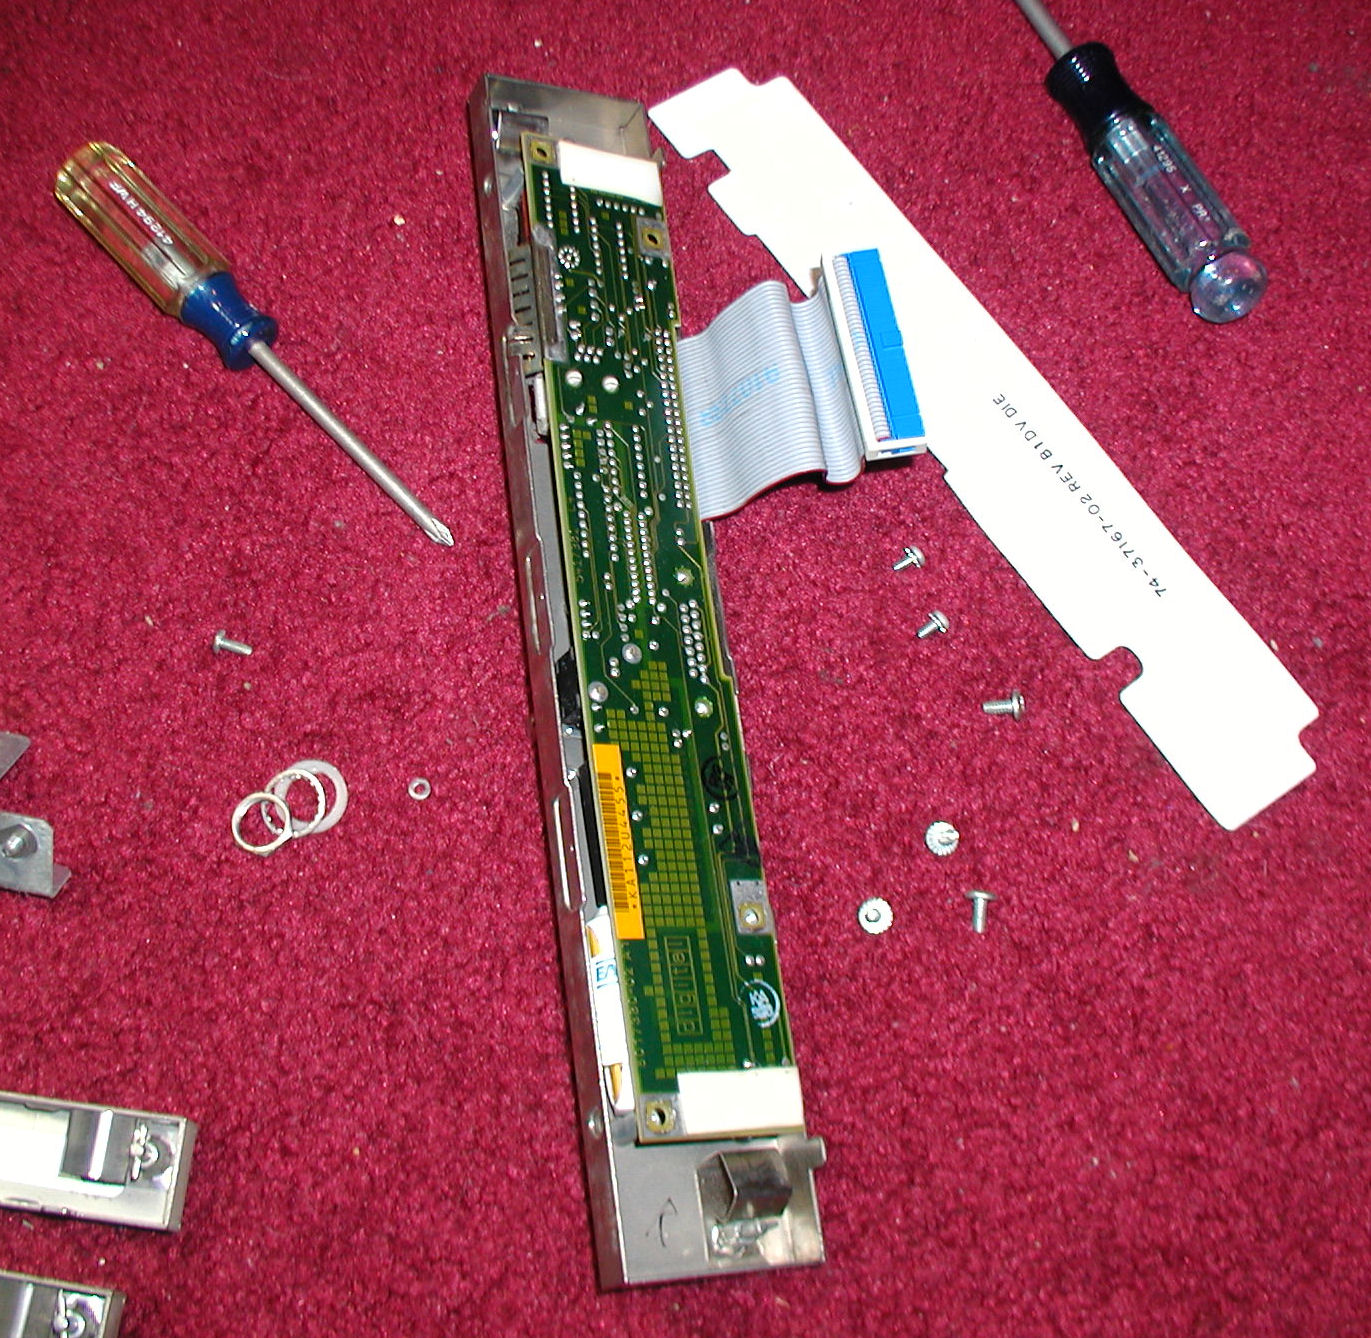 Note that you need to remove screws from both the front and the back, including the serial connector holder and co-ax connector holder to get to the NiCad battery pack. Click image for larger view.
I should not have had this component on a rug like this, oops. Here is a page that helped me locate the battery within processor bulkhead http://port-vax.netbsd.n...acement-on-vax-4000-300 More Photos Reply |
|
|
More About ALLOCLASS |
by Bill Degnan - 11/20/2015 14:34 |
|
"..Hi Bill,
Thanks for sharing that. It's handy to have all this in one place to refer people to when they arrive on the mailing list asking how to get into their new VAX, how to see what disks it has and so on. The $255 in the DIA5 device name is the device allocation class, also known as ALLOCLASS. This is a not very well explained and rather obscure corner of VMS. I think the original purpose of ALLOCLASS was to provide a way to ensure that particular devices that are visible to several nodes in a cluster via different paths can be configured so that all nodes see the same device name. This is important because the VMS distributed lock manager requires the full name of a file, including device name, to be the same wherever it is seen from. This problem usually arises when disks are served to multiple cluster nodes from a storage controller such as a HSC or a HSZ. If NODEA and NODEB can both see DUA0 (for example) on the storage controller and they both also serve this disk to other nodes in the cluster, the same disk could be seen from a third node as either NODEA$DUA0 or NODEB$DUA0 and file locking would then not operate correctly leading to possible data corruption. Many years ago, after a lot of head scratching, my boss and I eventually figured out that shadow sets can only be composed of members with a non zero ALLOCLASS. This is probably why lots of the examples of using ALLOCLASSes also invove shadow sets. I think we figured out why this made sense some time after that but I have since forgotten again. Your system might not have any shadow sets but it does have DSSI disks and these behave like each disk is effectively it's own cluster node. See: $ SHOW CLUSTER Setting a non-zero ALLOCLASS in this case may be preferable to the semi-random looking pseudo-node names for each disk that DSSI subsystems typically comes up with. It looks likely that the replacement DIA5 you obtained arrived configured with an ALLOCLASS (255) which is different to the ALLOCLASS your other disks are configured with (1). This can probably be changed by using $ SET HOST /DUP to connect to it but I never got into finding my way around that as the only DSSI disks I've ever seen died not long after I got them. You have probably been able to omit the $1$ when referring to your original disks because the system ALLOCLASS (set in SYSGEN) is likely also set to 1. I was hoping I might be able to clarify some of the confusion that often surrounds ALLOCLASS but reading back over what I wrote, it seems that I probably haven't. It seems to be a topic that is as hard to explain as it is to understand in the first place :-( Regards, P Coghlan. .." Reply |
|
|
Restore Complete |
by Bill Degnan - 12/03/2015 20:33 |
 A no-flash photo of the system in action. At present the system is logged into the BACKUP drive (DIA1). All three drives are bootable system drives.
Reply |
|
|
DECnet |
by Bill Degnan - 04/24/2016 15:07 |
|
Next: Update the 4000-200 startup file. systartup_VMS.COM to launch DECnet. This must be done before MULTINET is loaded. The decnet license is valid. The file is located here:
$ dir sys$common:[sysmgr] (which makes sense because VMS 6 was starting to transition into SYSMGR automation, you can read more about that somewhere else) The 4000-200 has been connected the MicroVAX 3100 via 15 pin port connectors. Access 3100 dir as such (?): $ dir cobuck::cobuck $dkb500:[.... not sure if this is the right command. $ lancp lancep> show conf (shows the decnet configuration) Reply |
|
|
Updating User Disk Quota |
by Bill Degnan - 11/06/2017 13:13 |
|
This is important, otherwise one can't save files or get email after a user is created.
Enter SYSMAN to check (for example) the SYSTEM user quota, or other users in the UIC 200 $ RUN SYS$SYSTEM:SYSMAN SYSMAN> diskquota show [*,*] /device=$1$dia0: For every new user there has to be a matching quota set, use others in the same UIC group to match. Assume the user you want to add is UIC = 200,3 and in this group the other quotas are 2000... SYSMAN> diskquota add [200,3] /device=$1$dia0: /permquota=2000 /overdraft=2000 Reply |
|
Resources:

Popular Topics and FAQs
Past Issues:
Before we switched over to a blog format, past page archives here:
Vintage Computer Festival East 3.0 June 2006
Commodore B Series Prototypes July 2006
VOLSCAN - The first desktop computer with a GUI? Oct 2006
ROBOTS! - Will Robots Take Over? Nov 2006
Magnavox Mystery - a Computer, or? Jan 2007
The 1973 Williams Paddle Ball Arcade Computer Game Feb 2007
The Sperry UNIVAC 1219 Military Computer May 2007
VCF East 2007 - PET 30th Anniversary June/July 2007
The Electronic Brain August 2007
Community Memory and The People's Computer Company October 2007
Charles Babbage's Calculating Machine December 2007
Vintage Computing - A 1983 Perspective February 2008
Laptops and Portables May 2008
From Giant Brains to Hobby Computers - 1957 to 1977 August 2008
Historic Computer Magazines November 2008
World's Smallest Electronic Brain - Simon (1950) December 2008 - Feb 2009
Free Program Listings Spring 2009
Computer Music Summer 2009
Popular Electronics Jan/Feb 1975 - Altair 8800 Fall 2009
Early Microcomputer Mass Storage Summer 2010
NewYorkWeeklyMessenger 2 13 1833 1
This image was selected at random from the archive. Click image for more photos and files from this set.