simH notes
SHARE |
|
 simH notes
 |
by Bill Degnan - 01/12/2017 12:04 |
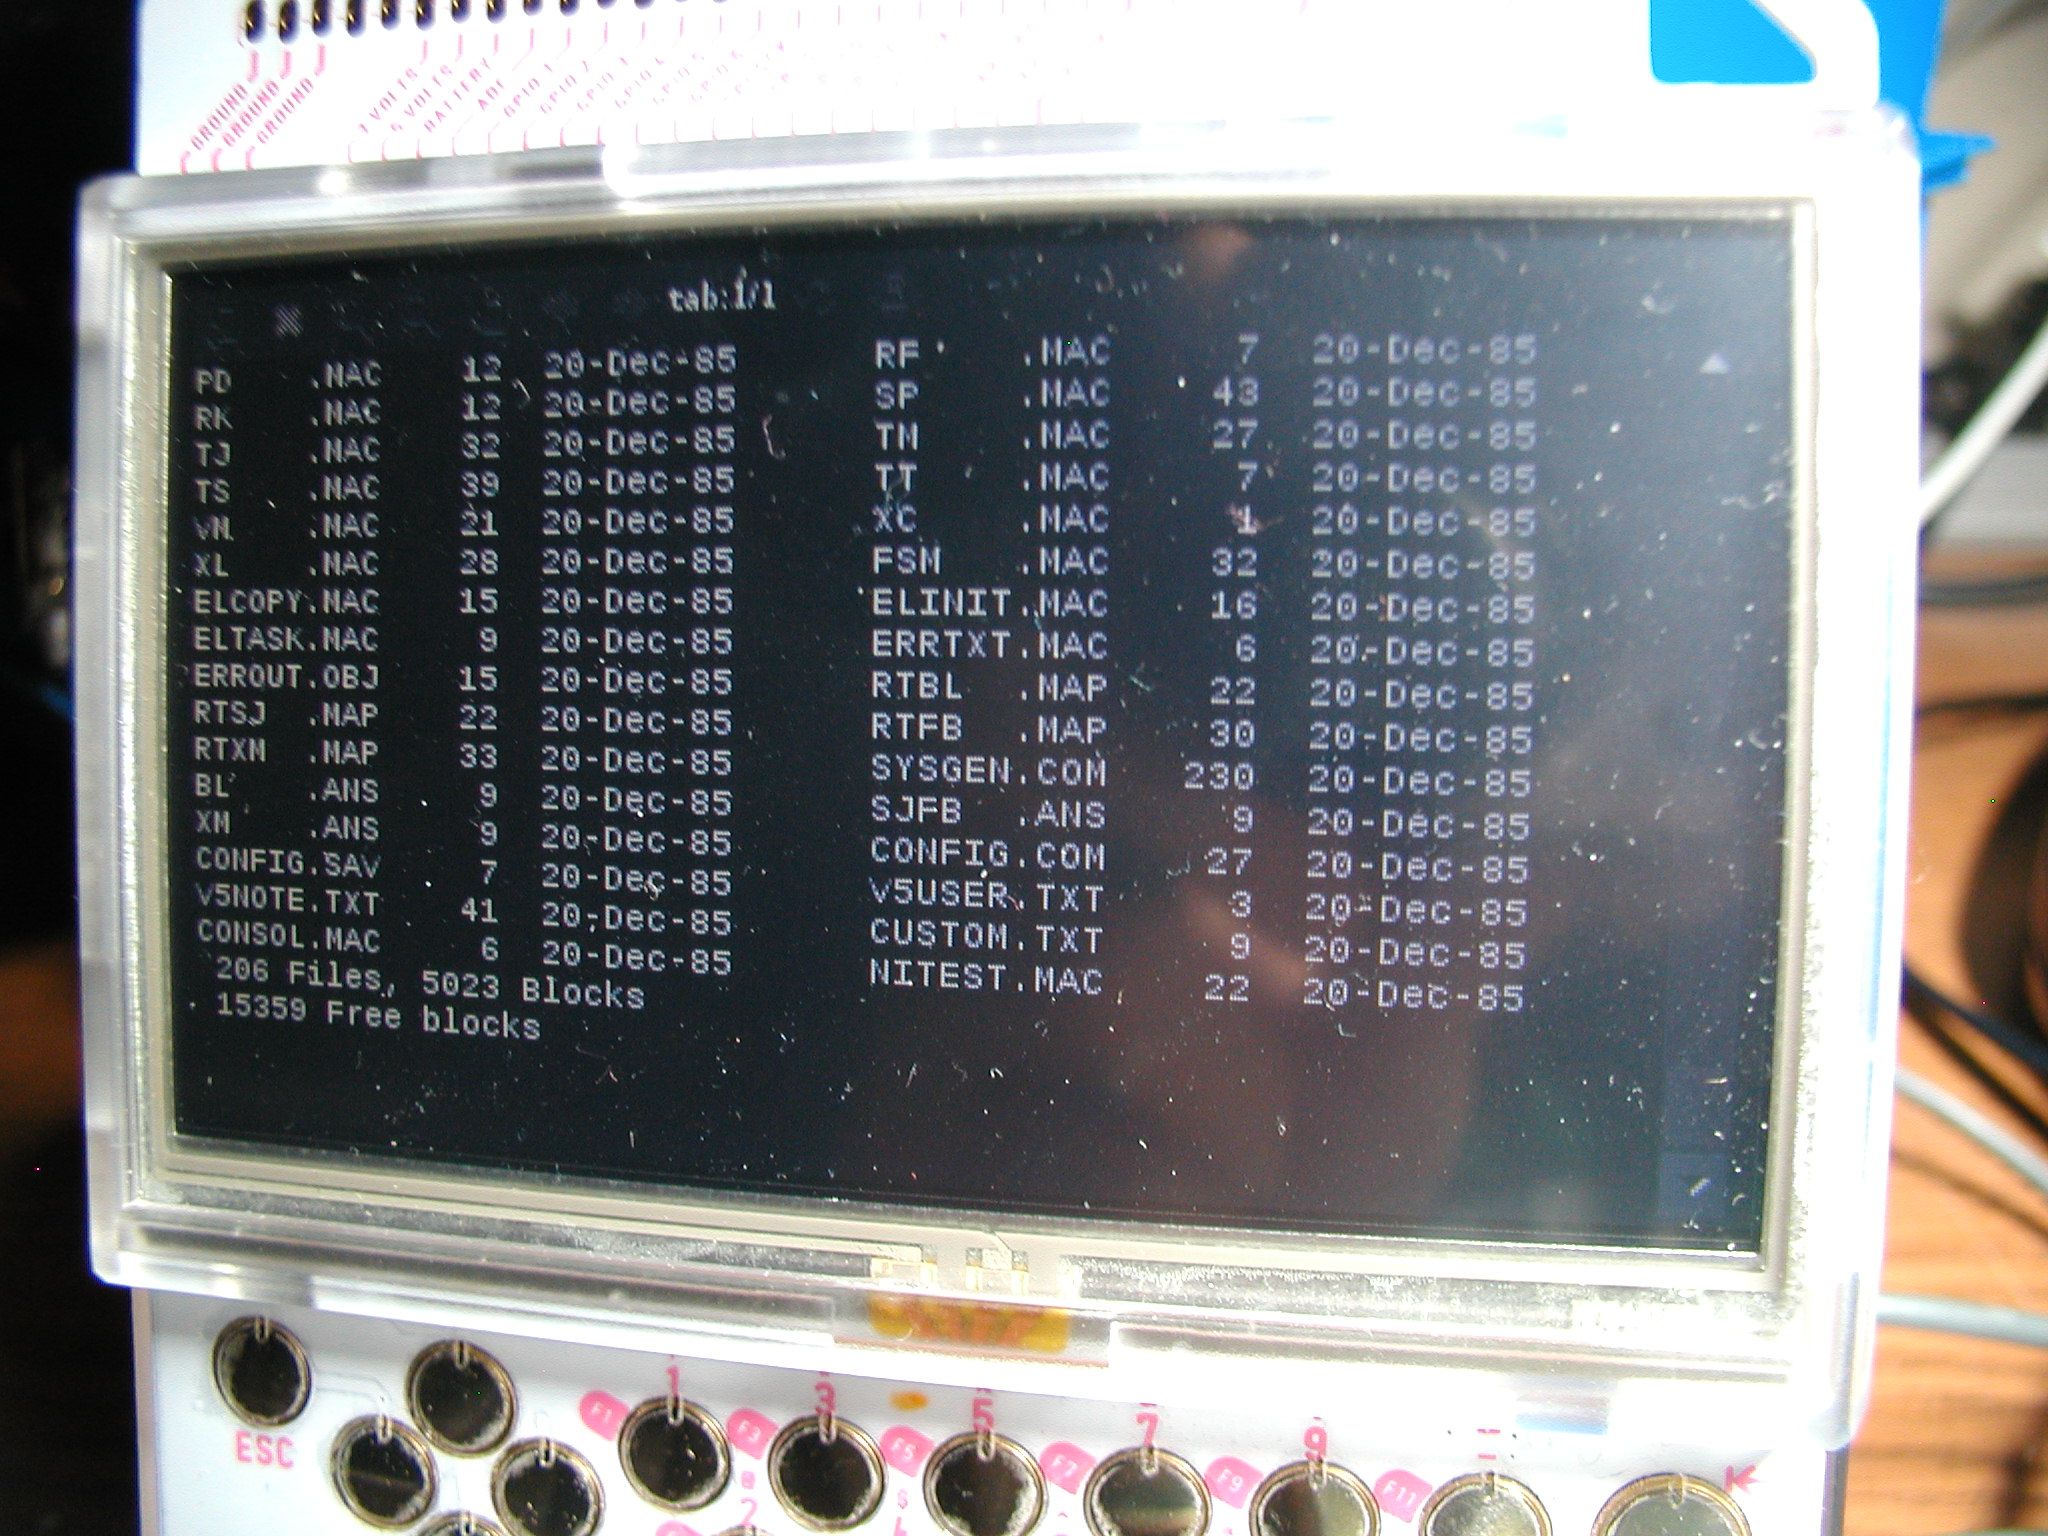 simH RT-11 running on the Pocket CHIP single board computer.
Here is the simh layout I have settled on so I can have all types of emulation in one place. I have a /BIN for the emulator bin files (altair, pdp11, nova, vax, etc.) created by the MAKE process from the source files. I also created a directory for each emulator to hold system-specific ini and media files. Assuming you're using a linux for these things, and you're set up the same way... 1. Log in 2. $ cd [../simhdir]/[emulatordir] where [emulatordir] = name of system such as pdp11 eg. $ cd/simh/PDP11 3. $ ../BIN/pdp11 (the file that the MAKE process created you want to use) 4. At this point you should be at the simh> prompt. simH loaded, but no system specified to emulate. The instructions for each system are stored in a script called [whatever].ini. For example ../PDP11/init.ini 5. Run the command simh> DO [whatever].ini where [whatever] is the ini script that sets up your simh instance. Being that you launch simh from the [emulatornamehere] directory and not the BIN directory you don't need to specify dir locations of support files (bootstraps, tapes, disks, etc.) For example, here is a PDP11 ini file that boots up a PDP11/23 sets a printer output file and boots into a RL02 with RT-11 on it. Note that I have two files in the /PDP11 directory, set cpu 11/23+ 256K attach LPT lpt.txt set rl0 writeenabled set rl0 rl02 attach rl0 rl0.dsk set rl0 badblock boot rl0 quit 6. This example should load you into RT-11 dot prompt, assuming you've already initialized RT 11 (that's a separate ini file on my system called inst.ini). Do what you wish and when you're ready to exit CTRL+E. I will eventually upload to simh files location on this site when I made something custom or download from another location, just so it's all in one place. Right now I am running simH from an old Raspberry Pi model A, and I also put it on my Pocket CHIP. Reply |
|
 Using ini to start emulator
 |
by Bill Degnan - 01/13/2017 17:22 |
|
This came in today from a site member:
Information Name: Dave Riley Email: fraveydank-at-gmail-dot-com ------------------------- Comments: It's even easier to start particular emulators with an .ini file; you can just use the file as a parameter (e.g. "pdp11 machines/rsx11m46.ini"). Of course, that means that if the emulator exits (crash, normal exit), it exits instead of dropping to a command prompt, but you can resolve that with various solutions like screen or systemd init scripts. Reply |
|
|
CHIP connection to serial terminal |
by Bill Degnan - 01/14/2017 20:23 |
|
Don't want to be stuck using SSH or the tiny Pocket to access simH? Add a serial terminal. A vintage serial terminal to access simH is the way to go.
Here are few notes These directions work for both the Pocket CHIP or bare CHIP. In addition to the Pocket CHIP I also have a CHIP with an HDMI "DIP" add-on board whose Debian build does not default to support a USB as serial port. For the bare CHIP I decided to set it to boot into the CLI and scan for a serial connection via USB as the io device . First I needed to confirm the USB to serial cable driver loads when detected, and the default baud rate of the tty USB is 9600. Also I needed to activate the USB port to be ready upon boot. To start, boot your CHIP with the USB ro serial cable attached. Put a null modem adapter between your CHIP and the terminal. You need to know the name the machine uses for the USB "tty" port This is what the system will call your USB to Serial connection: $ dmesg | grep tty (look for ttyUSB0, 1, 2, etc.in the output make a note of the name used) Do you have the driver loaded and set for your USB to Serial cable? Here is a bash script that you can use, I found one that works and named it testUSB.sh, and put it in the /dev directory. #!/bin/bash for sysdevpath in $(find /sys/bus/usb/devices/usb*/ -name dev); do ( syspath="${sysdevpath%/dev}" devname="$(udevadm info -q name -p $syspath)" [[ "$devname" == "bus/"* ]] && continue eval "$(udevadm info -q property --export -p $syspath)" [[ -z "$ID_SERIAL" ]] && continue echo "/dev/$devname - $ID_SERIAL" ) done The output I got was: /dev/ttyUSB0 - Prolific_Technology_Inc._USB-Serial_Controller (yours may vary, depending whether you use the Prolific USB to serial able or some other.) ----------------------------- If you don't get a response similar to this, you need to install the driver for your cable. Before you do that reboot with the cable installed, maybe the OS will recognize it. Assuming you have a driver loaded..... Run a command to check the status of your USB serial port. My CHIPs both use ttyUSB0 so the command is: $ stty -F /dev/ttyUSB0 (the output will tell you the baud rate to set the terminal on the other end, etc) If changes are needed, such as baud rate... $ stty -F /dev/ttyUSB0 9600 After confirming one has the driver loaded and the correct serial connection settings, check the status of the USB to serial port to see if it's actively monitoring for serial console connections inbound: systemctl status serial-getty@ttyUSB0.service If it's not active, turn it on! sudo systemctl start serial-getty@ttyUSB0.service Test. Hopefully the result is a login prompt on the serial terminal. Have fun! If you want this USB Serial console to be available on boot, make it permanent: systemctl enable serial-getty@ttyUSB0.service Reply |
|
Resources:

Popular Topics and FAQs
Past Issues:
Before we switched over to a blog format, past page archives here:
Vintage Computer Festival East 3.0 June 2006
Commodore B Series Prototypes July 2006
VOLSCAN - The first desktop computer with a GUI? Oct 2006
ROBOTS! - Will Robots Take Over? Nov 2006
Magnavox Mystery - a Computer, or? Jan 2007
The 1973 Williams Paddle Ball Arcade Computer Game Feb 2007
The Sperry UNIVAC 1219 Military Computer May 2007
VCF East 2007 - PET 30th Anniversary June/July 2007
The Electronic Brain August 2007
Community Memory and The People's Computer Company October 2007
Charles Babbage's Calculating Machine December 2007
Vintage Computing - A 1983 Perspective February 2008
Laptops and Portables May 2008
From Giant Brains to Hobby Computers - 1957 to 1977 August 2008
Historic Computer Magazines November 2008
World's Smallest Electronic Brain - Simon (1950) December 2008 - Feb 2009
Free Program Listings Spring 2009
Computer Music Summer 2009
Popular Electronics Jan/Feb 1975 - Altair 8800 Fall 2009
Early Microcomputer Mass Storage Summer 2010
Refalo KX1601
This image was selected at random from the archive. Click image for more photos and files from this set.